Bringing nature indoors has never been more appealing than it is today. Creating natural wall hangings offers both an accessible entry point into botanical art and a deeply satisfying way to connect with the organic world around us.
Understanding Natural Wall Hangings

Natural wall hangings represent a unique intersection of botanical preservation and artistic expression. Unlike synthetic decorations, these pieces capture authentic textures, colors, and forms found in nature itself. Each wall hanging becomes a conversation between the materials you’ve gathered and your creative vision.
I find that the most compelling natural wall hangings tell a story—whether it’s pressed flowers from a memorable garden walk or driftwood collected during a peaceful beach morning. The materials themselves carry inherent beauty that requires minimal manipulation to create stunning wall art.
Essential Materials Categories
Botanical Elements
– Fresh flowers and foliage for pressing
– Dried eucalyptus, lavender, and baby’s breath
– Ferns and delicate leaves
– Pine cones for textural contrast
Natural Foundations
– Driftwood branches for rustic frames
– Smooth river stones and beach pebbles
– Bark pieces and wooden elements
– Seashells for coastal themes
Supporting Supplies
– Natural twine, jute, or hemp rope
– Acid-free paper and cardstockd Podge or archival glue
– Basic tools: scissors, tweezers, brushes
Project 1: Pressed Flower Wall Art

Time Investment: 2-3 hours (plus pressing time)
Pressed flower art creates timeless botanical displays that preserve natural beauty indefinitely. The key lies in selecting flowers at their peak condition and using proper pressing techniques.
Materials Needed:
- Fresh flowers with single-layer petals
- Heavy books or flower press
- Archival mounting board
- Picture frames with glass
- Tweezers for delicate handling
Step-by-Step Process:
-
Flower Selection and Preparation
Choose flowers like pansies, violas, cosmos, or daisies—varieties with naturally flat profiles press most successfully. Collect materials early in the day when morning dew has evaporated but before afternoon wilting begins. -
Pressing Technique
Place each flower between sheets of absorbent paper, then position within heavy books. Apply consistent pressure for 7-14 days, checking periodically for complete moisture removal. Properly pressed flowers will feel papery and maintain their color integrity. -
Design Development
Before adhering anything permanently, arrange your pressed elements on the mounting surface. Consider balance, color distribution, and natural flow patterns. Take photographs of successful arrangements for reference. -
Final Assembly
Using archival glue applied sparingly, secure each element to the mounting board. Work methodically from background elements to foreground details, allowing each piece to fully adhere before adding the next.
Advanced Techniques
For enhanced visual impact, consider layering different plant materials or creating gradient effects with similar flowers in varying stages of color development. Some crafters successfully incorporate small amounts of mica powder or natural pigments to subtly enhance faded colors.
Project 2: Eucalyptus Wall Hanging
Time Investment: 45 minutes – 1 hour
Eucalyptus wall hangings bring sophisticated simplicity to any space while providing natural aromatherapy benefits. The silvery-green foliage creates elegant cascading lines that complement both modern and rustic interiors.
Materials Required:
- 5-7 eucalyptus sprigs (fresh, dried, or preserved)
- Wooden dowel or found driftwood branch
- Natural twine or jute rope
- Sharp scissors
Construction Process:
-
Branch Preparation
Select a horizontal support piece 12-18 inches long—driftwood adds organic character, while a clean dowel provides modern minimalism. Sand any rough edges that might snag the hanging cord. -
Eucalyptus Arrangement
Lay out your sprigs to determine the most pleasing composition. Typically, longer pieces work best in the center with progressively shorter ones toward the edges, creating a natural V-shape or gentle curve. -
Attachment Method
Cut individual pieces of twine, each approximately 4-6 inches long. Tie each eucalyptus stem to the support branch, positioning the knots consistently on the back side for a clean front appearance. -
Finishing Details
Create a hanging loop using a longer piece of twine. For added stability, I recommend knotting the hanging cord at both ends of the branch rather than creating a single central attachment point.
Seasonal Variations
Fresh eucalyptus will naturally dry over time, developing deeper color tones and maintaining its aromatic properties for months. For immediate use, pre-dried eucalyptus offers consistency and longevity, while artificial eucalyptus ensures permanent color retention in high-humidity environments.
Project 3: Driftwood and Shell Mobile
Time Investment: 2-3 hours
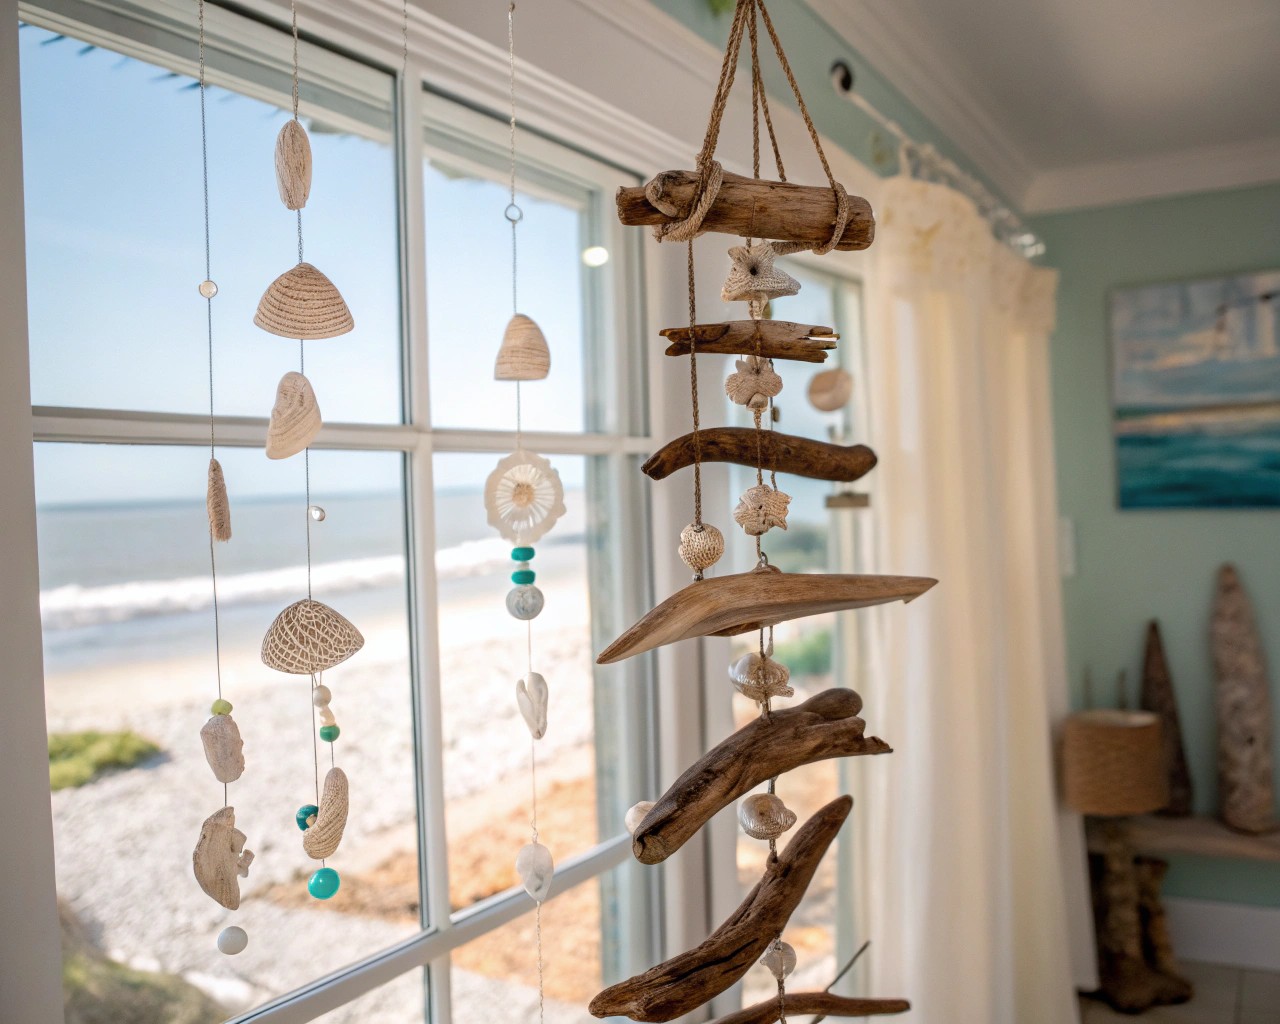
Combining driftwood with seashells creates coastal-inspired wall hangings that capture the essence of oceanside discoveries. This project works exceptionally well for displaying collections from beach vacations or local shoreline explorations.
Essential Components:
- Substantial driftwood piece for the main support
- Assorted seashells in various sizes
- Strong fishing line or clear jewelry wire
- Small drill with fine bits
- Hot glue gun and sticks
Assembly Instructions:
-
Driftwood Preparation
Clean your driftwood thoroughly, removing any loose bark or debris. Sand the edges if necessary, but preserve the natural weathered character that makes driftwood appealing. -
Shell Preparation
Carefully drill small holes in each shell, working slowly to prevent cracking. Start with the smallest drill bit possible and gradually increase size if needed. Position holes to allow shells to hang naturally when suspended. -
Strand Creation
Plan your hanging strands before assembly. Create visual interest by varying strand lengths and shell combinations. Larger shells typically work best as anchor points, with smaller shells filling intermediate positions. -
Final Assembly
Thread shells onto fishing line, securing each with small knots. Attach completed strands to your driftwood support at regular intervals, testing balance as you work.
Design Considerations
Consider the visual weight distribution across your mobile. Heavier elements should generally cluster toward the center, with lighter pieces extending toward the edges. This creates both physical balance and pleasing visual proportions.
Project 4: Pine Cone Flower Art
Time Investment: 1.5-2 hours
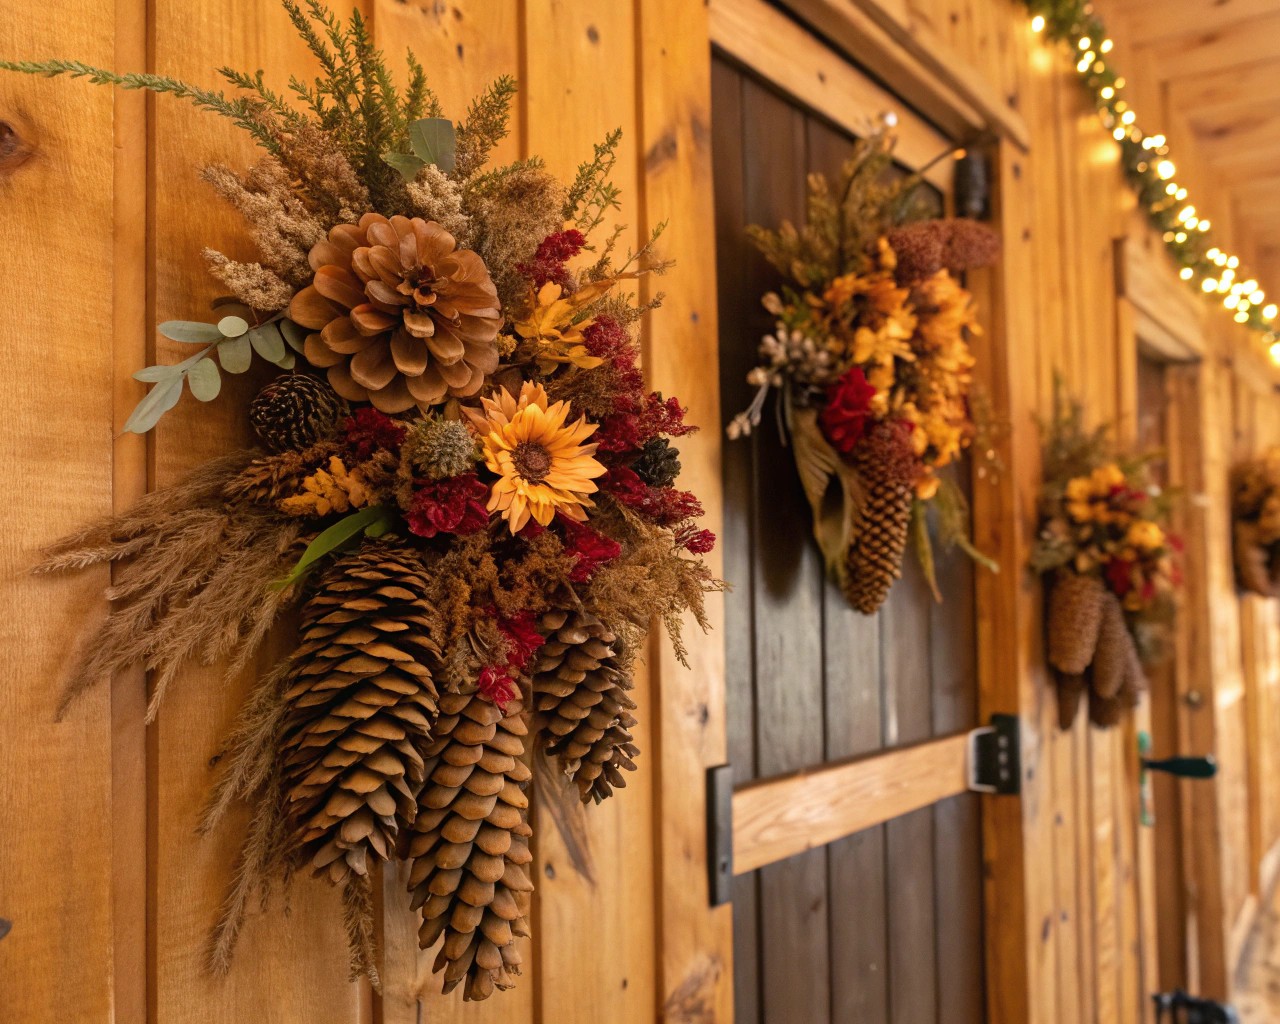
Transforming pine cones into flower-like forms creates unique textural wall art that celebrates autumn’s natural bounty. This technique works particularly well for seasonal displays or permanent installations in rustic-themed spaces.
Required Materials:
- 8-12 medium to large pine cones
- Sharp pruning shears
- Acrylic paints in natural tones
- Picture frame or wooden backing board
- Hot glue gun and sticks
- Fine paintbrushes
Creation Process:
-
Pine Cone Preparation
If using outdoor-collected pine cones, bake them at 200°F for 20-30 minutes to eliminate insects. Allow complete cooling before handling. -
Flower Formation
Using sharp pruning shears, carefully remove pine cone scales from the bottom upward, creating flower-like shapes. Work slowly and deliberately—rushed cutting often results in uneven or damaged forms. -
Color Application
Paint your pine cone flowers in subtle, nature-inspired hues. Earth tones, soft pastels, or muted jewel tones work particularly well. Apply paint sparingly to maintain natural texture visibility. -
Mounting and Display
Arrange your completed flowers on your backing surface before gluing. Consider creating clusters of varying sizes or organizing them in flowing, organic patterns that mimic natural growth.
Creative Extensions
Some crafters enjoy adding pipe cleaner stems painted in coordinating colors, creating more literal flower representations. Others prefer the abstract quality of the pine cone flowers mounted directly to their backing surface.
Project 5: Macrame Leaf Wall Hanging
Time Investment: 2-3 hours
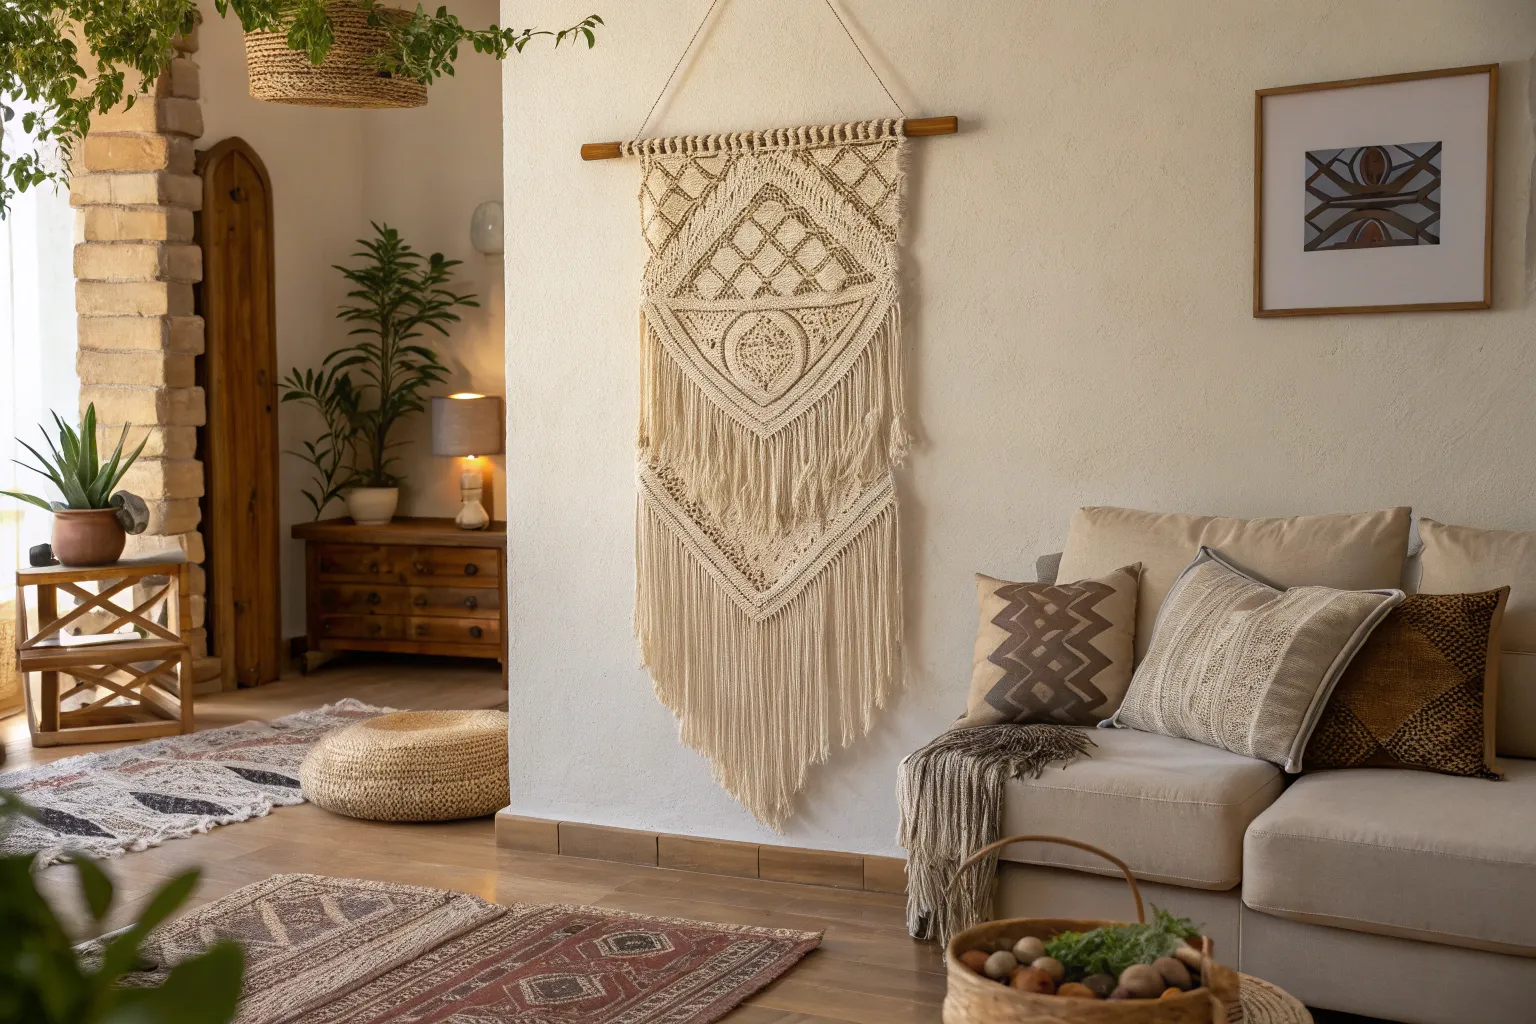
Macrame techniques adapted for leaf-shaped forms create sophisticated natural wall hangings that blend traditional fiber arts with botanical inspiration. These pieces work beautifully as standalone art or grouped in collections.
Supplies Needed:
- 3mm macrame cord in natural colors
- 12-inch wooden dowel
- Sharp scissors
- Fine-tooth comb for fringing
- Spray stiffener or hairspray
Construction Steps:
-
Cord Preparation
Cut your macrame cord according to your chosen pattern. Most leaf patterns require 20-30 pieces of varying lengths, typically ranging from 20-35 inches each. -
Foundation Setup
Attach your working cords to the dowel using lark’s head knots. Space them evenly across the dowel length, ensuring adequate coverage for your intended leaf width. -
Leaf Shaping
Work your chosen macrame pattern, gradually increasing then decreasing cord lengths to create natural leaf proportions. Pay attention to maintaining even tension throughout your work. -
Finishing Touches
Comb out the bottom portion of your cords to create realistic leaf fringe. Trim carefully to achieve your desired leaf shape, then apply spray stiffener to maintain form when hung.
Pattern Variations
Experiment with different knot combinations to create varied leaf textures. Square knots produce uniform, structured appearances, while alternating patterns create more organic, flowing forms that better mimic natural leaf structures.
Project 6: Stone and Twig Composition
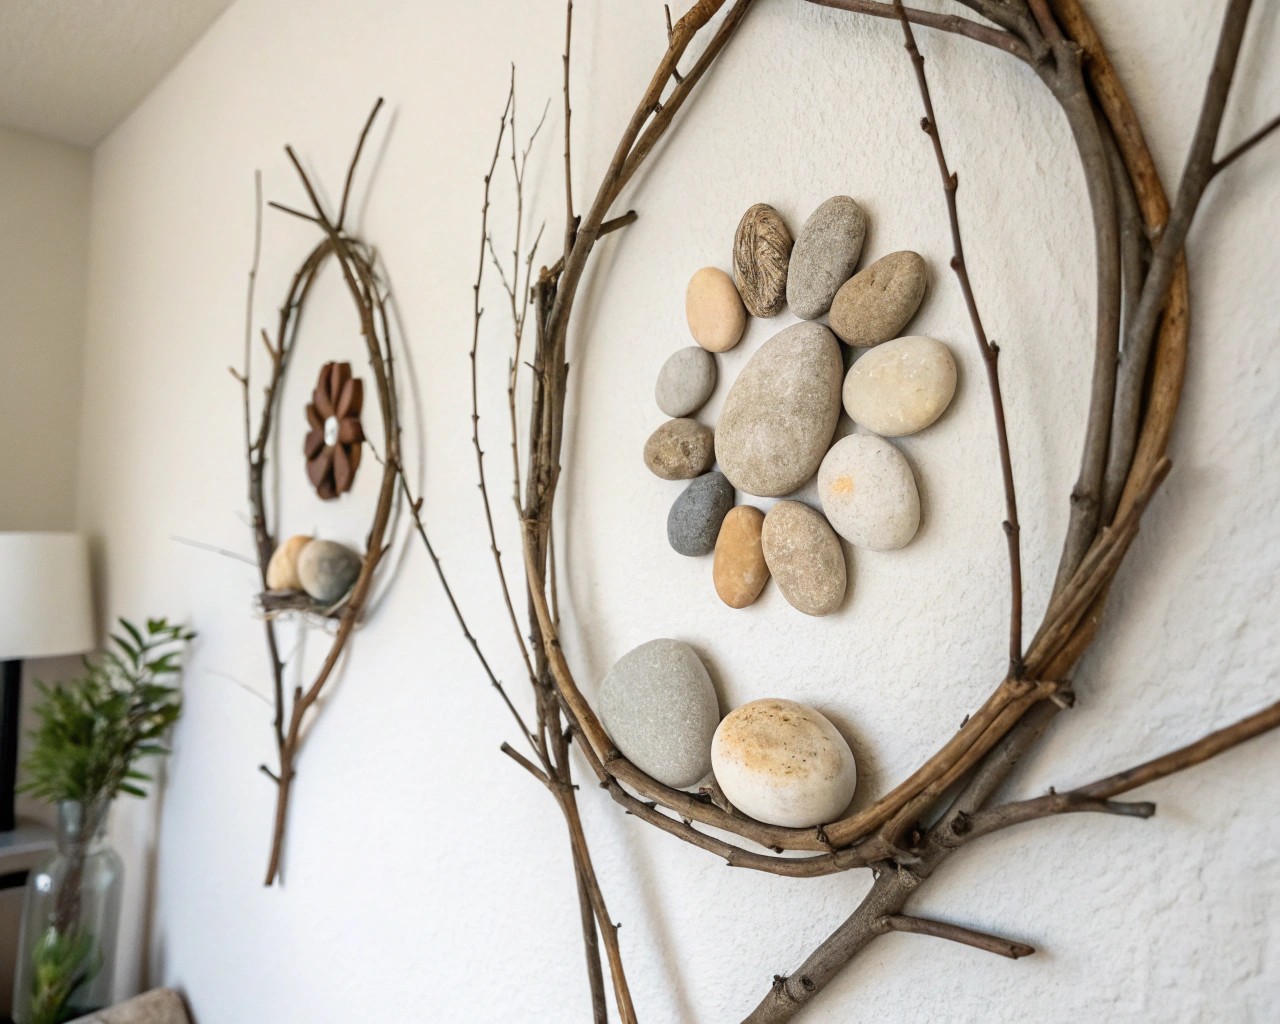
Time Investment: 1-2 hours
Combining smooth stones with interesting twigs creates minimalist wall art that celebrates natural forms and textures. These compositions work particularly well in contemporary spaces seeking organic elements.
Materials List:
- 10-15 smooth, flat stones
- 3-5 interesting twigs or small branches
- Wooden backing board or canvas
- Strong craft adhesive
- Natural finish or clear sealant
Assembly Process:
-
Material Selection
Choose stones with similar thickness but varying sizes. Look for twigs with interesting curves, textures, or natural character marks that add visual interest without overwhelming the composition. -
Design Development
Arrange your materials on the backing surface before gluing. Consider principles of visual balance, rhythm, and proportion. Take photographs of successful arrangements for reference. -
Permanent Attachment
Apply strong adhesive to the flattest surface of each stone. Press firmly and hold until secure. Work systematically to avoid disturbing previously placed elements. -
Final Finishing
Once all elements are securely attached, consider applying a clear protective finish. This step is particularly important for pieces intended for high-humidity locations.
Compositional Guidelines
Think of your stone and twig arrangement as a abstract landscape or natural mandala. Create visual paths that lead the eye through the composition, using larger stones as anchor points and twigs as connecting elements.
Project 7: Air Plant Display System
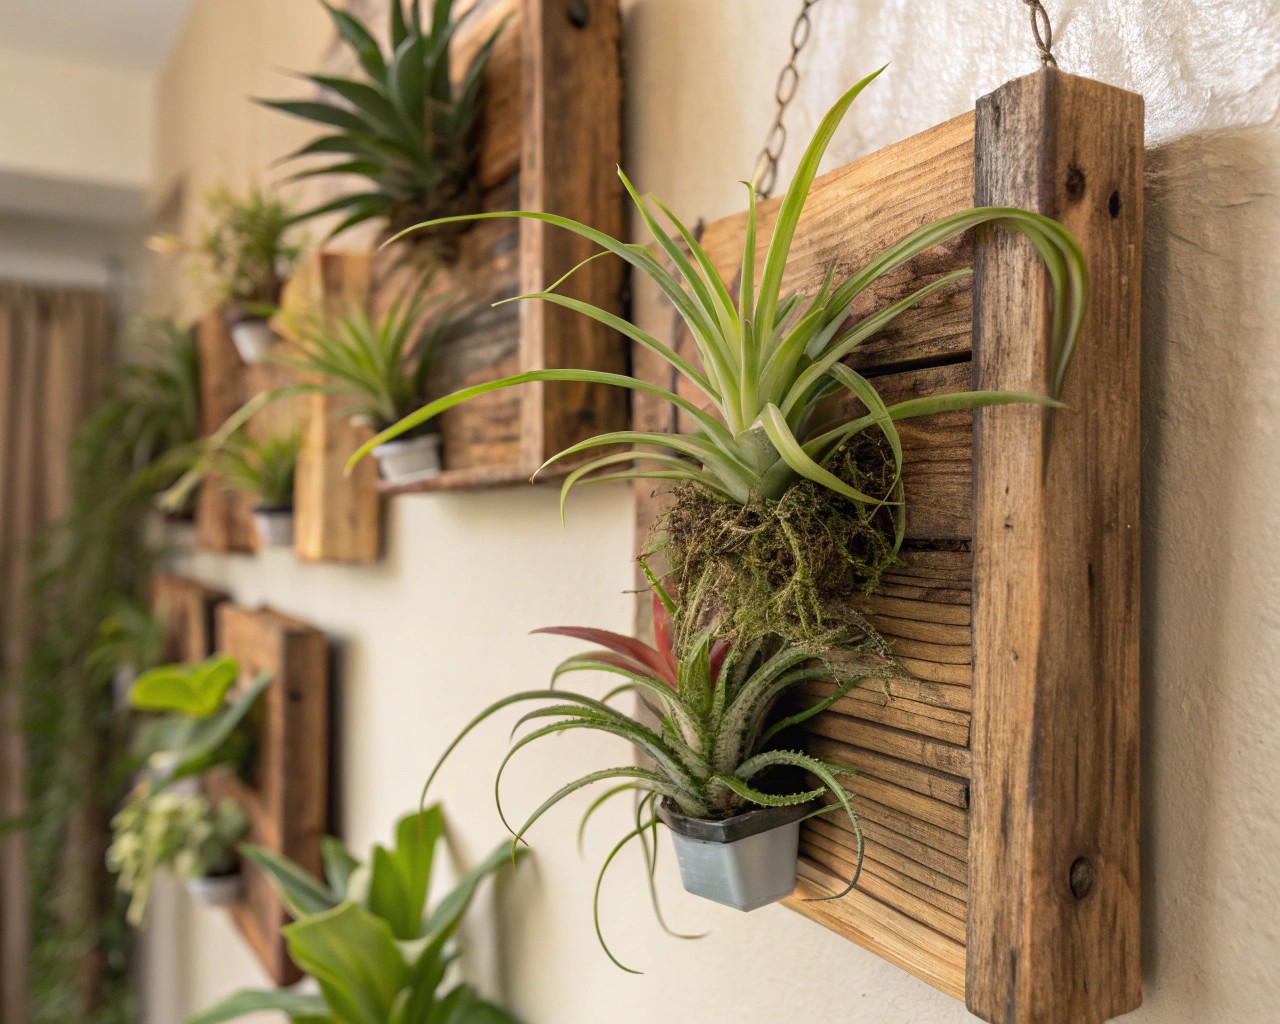
Time Investment: 1 hour
Air plants (Tillandsia) create living wall hangings that require minimal maintenance while providing ongoing natural beauty. These epiphytic plants thrive without soil, making them perfect for vertical displays.
Required Components:
- 3-5 air plants in varying sizes
- Wooden mounting board or driftwood
- Air-dry clay for holders
- Wire or twine for attachment
- Spray bottle for plant care
Creation Method:
-
Holder Formation
Shape small clay holders to cradle your air plants without completely enclosing them. Air plants require air circulation around their entire surface area for healthy growth. -
Mounting System
Attach clay holders to your backing board using appropriate fasteners. Ensure secure attachment while maintaining accessibility for plant removal during weekly watering. -
Plant Placement
Position air plants in their holders, ensuring they sit securely but can be easily removed. Consider the natural growth patterns of different Tillandsia varieties when arranging. -
Care Integration
Plan your display location considering air plants’ need for bright, indirect light and weekly water baths. Easy access for maintenance ensures long-term success.
Maintenance Considerations
Air plants require weekly removal from their display for thorough soaking. Choose a mounting system that facilitates this routine care while maintaining the visual integrity of your wall hanging.
Seasonal Adaptation Strategies
Natural wall hangings can evolve throughout the year by incorporating seasonal elements or adjusting existing compositions. This adaptability keeps your displays fresh and connected to natural cycles.
Spring Integration
- Add fresh pressed flowers as they become available
- Incorporate new growth twigs with emerging buds
- Update eucalyptus with fresh, more vibrant sprigs
Summer Enhancements
- Expand pressed flower collections with peak season blooms
- Add seashells and coastal elements from summer travels
- Integrate air plants that thrive in higher humidity
Autumn Transformations
- Feature pine cone elements and fall foliage
- Incorporate dried seed pods and autumn branches
- Add warmth with amber and orange-toned natural materials
Winter Adaptations
- Focus on evergreen elements and preserved materials
- Emphasize textures through bark and stone compositions
- Highlight structural elements like interesting branch silhouettes
Preservation and Longevity
Proper preservation techniques ensure your natural wall hangings maintain their beauty for months or years. Understanding each material’s specific requirements prevents deterioration and extends display life.
Botanical Preservation
- Store pressed materials in acid-free environments
- Apply UV-protective glass to framed pieces
- Monitor humidity levels to prevent mold development
Natural Material Care
- Clean driftwood periodically to remove dust accumulation
- Treat natural fibers with appropriate protective finishes
- Rotate displays occasionally to prevent uneven fading
Display Environment Optimization
- Position hangings away from direct sunlight
- Maintain consistent temperature and humidity levels
- Ensure adequate air circulation around three-dimensional elements
Advanced Design Principles
Creating truly exceptional natural wall hangings requires understanding fundamental design principles that govern visual harmony and aesthetic appeal. These concepts, borrowed from interior design and fine arts, elevate simple craft projects into sophisticated wall art.
Scale and Proportion Relationships
The relationship between your wall hanging’s size and its display location significantly impacts visual effectiveness. A delicate pressed flower arrangement might disappear on a large wall, while an oversized driftwood piece could overwhelm a small space.
I recommend measuring your intended display area and creating wall hangings that occupy roughly one-third to one-half of the available space. This proportion creates visual presence without domination, allowing the piece to enhance rather than compete with surrounding elements.
Color Harmony in Natural Materials
Natural materials offer subtle but rich color palettes that require thoughtful coordination. Even within a single medium like pressed flowers, color relationships can make or break a composition’s success.
Consider working within analogous color schemes—colors that sit next to each other on the color wheel. For example, combining yellow pressed flowers with green foliage and brown twigs creates natural harmony. Alternatively, use monochromatic schemes with varied textures to create sophisticated, calming displays.
Textural Contrast and Visual Interest
Successful natural wall hangings typically incorporate multiple textures to create visual depth and tactile appeal. Smooth stones provide excellent contrast to rough bark, while delicate pressed flowers balance beautifully against sturdy driftwood frames.
Plan your textural combinations deliberately rather than randomly. Too many similar textures create monotony, while too many contrasting textures produce chaos. Aim for three to five distinct textural elements within a single composition.
Troubleshooting Common Challenges
Even experienced crafters encounter obstacles when working with natural materials. Understanding common issues and their solutions prevents frustration and ensures successful project completion.
Material Preparation Problems
Pressed Flowers Turning Brown
This typically results from insufficient drying before pressing or pressing flowers past their prime. Collect flowers in mid-morning after dew evaporation but before afternoon stress begins. Ensure flowers are completely moisture-free before pressing.
Pine Cones Not Opening Properly
Some pine cones remain tightly closed even after collection. Place closed cones in a warm, dry location for several days before crafting. Alternatively, use slightly opened cones in warm, humid conditions, allowing them to close naturally over time for different textural effects.
Driftwood Structural Weakness
Beach-collected driftwood sometimes appears solid but contains weak internal structures. Test pieces by applying gentle pressure before incorporating them into projects. Reinforce weak areas with clear wood hardener if necessary.
Assembly and Construction Issues
Adhesive Failures with Natural Materials
Standard craft glues often fail when bonding irregular natural surfaces. Clean all surfaces thoroughly before bonding, and consider mechanical fasteners (small screws or wire) for critical connections. E6000 adhesive works exceptionally well for most natural material combinations.
Uneven Weight Distribution
Wall hangings that appear balanced during construction may hang awkwardly when vertical. Test hang your piece frequently during construction, adjusting element placement as needed. Consider adding small counterweights behind lightweight sections.
Seasonal Material Changes
Natural materials continue evolving after incorporation into wall hangings. Fresh eucalyptus will dry and curl, green twigs may crack as they age, and some pressed flowers may continue fading. Plan for these changes or select materials that have already stabilized.
Professional Display Techniques
Transform your natural wall hangings from craft projects into gallery-quality art through professional presentation methods. These techniques, borrowed from museum and interior design practices, significantly enhance visual impact.
Lighting Considerations
Natural materials respond dramatically to different lighting conditions. Pressed flowers reveal intricate vein patterns under proper illumination, while textured surfaces like bark and stone create compelling shadow play.
Position track lighting or picture lights to graze across textured surfaces at shallow angles. This technique, called “raking light,” emphasizes surface irregularities and creates depth. Avoid direct frontal lighting, which flattens textures and may accelerate fading in delicate materials.
Grouping and Gallery Wall Arrangements
Single natural wall hangings can appear isolated unless thoughtfully integrated into larger display schemes. Create visual relationships between pieces through consistent themes, complementary scales, or repeated materials.
When creating gallery walls with natural hangings, maintain consistent spacing between pieces—typically 2-3 inches for small works, up to 6 inches for larger pieces. Use paper templates cut to size for planning arrangements before committing to nail holes.
Professional Framing Approaches
While many natural wall hangings work beautifully unframed, strategic framing can elevate certain pieces significantly. Shadow boxes work particularly well for three-dimensional elements like pine cone compositions or shell arrangements.
Choose frames that complement rather than compete with your natural materials. Simple, clean-lined frames in natural wood or metal typically work best. Avoid ornate or highly decorative frames that distract from organic beauty.
Sustainable Crafting Practices
Creating natural wall hangings offers opportunities to embrace environmentally conscious crafting practices. These approaches not only reduce environmental impact but often produce more authentic, meaningful results.
Ethical Material Collection
Collect natural materials responsibly to ensure ecosystem preservation. Never harvest from protected areas, and always collect minimally from any single location. Focus on fallen branches, naturally shed materials, and common species rather than rare or stressed plants.
Consider timing your collection activities to minimize environmental impact. Fall collection of dropped leaves and seed pods, winter gathering of bare branches, and spring collection of pruned materials align with natural cycles.
Waste Reduction Strategies
Natural wall hanging projects generate minimal waste when planned thoughtfully. Save material scraps for future projects—small pressed flower fragments work beautifully in greeting cards or bookmarks, while twig trimmings often find use in miniature compositions.
Repurpose existing materials whenever possible. Old picture frames, wooden boards from previous projects, and even damaged natural materials can often find new life in creative applications.
Local Sourcing Benefits
Emphasizing locally sourced materials creates wall hangings that authentically reflect your specific environment. These pieces carry stronger personal and emotional connections while supporting local ecosystem awareness.
Document your material sources through photography or journal keeping. This practice deepens your connection to local natural spaces while creating valuable references for future projects or sharing experiences with others.
Teaching and Sharing Techniques
Natural wall hanging creation offers excellent opportunities for sharing knowledge and building community connections. These projects work well for various skill levels and age groups, making them ideal for workshops or family activities.
Workshop Structure and Planning
Structure natural wall hanging workshops around clear, achievable goals within defined timeframes. Most projects work well in 2-3 hour sessions, allowing time for material selection, construction, and finishing.
Prepare materials in advance to maximize creative time during workshops. Pre-pressed flowers, pre-cut cords, and organized material stations allow participants to focus on design and assembly rather than preparation tasks.
Skill Level Adaptations
Adapt project complexity to match participant skill levels. Beginners might focus on simple eucalyptus hangings or basic pressed flower arrangements, while advanced crafters can tackle complex macrame patterns or multi-element compositions.
Provide alternatives within single projects to accommodate different skill levels. Offer pre-cut materials for beginners while encouraging advanced participants to prepare their own elements from raw materials.
Community Building Through Crafting
Natural wall hanging projects often spark conversations about local ecosystems, seasonal changes, and personal memories associated with natural spaces. Encourage these discussions as valuable components of the crafting experience.
Consider organizing seasonal workshops that align with natural material availability. Spring pressing workshops, summer beach collection events, and autumn pine cone gathering expeditions create ongoing community engagement opportunities.
